what is the best way to frame fiberon symmetry railing
How to Film Frame a Deck: Proper Framing & Blocking

WHAT TO KNOW Before You lot BUILD
Pattern Details >
This guide assumes the use of square-shoulder v.5" deck boards and 1/8" spacing in a straight, edge-to-edge pattern, with the exception of the edge.
Railing Details >
Your railing will either exist installed top of the deck boards afterwards their own installation, or yous will demand to trim your deck boards around the structural 4x4 posts.
How to Picture show Frame a Deck: Installation Tips
Estimated based on a 16' 10 twenty' deck; time will vary depending on the size of deck and complexity of the build.
OVERVIEW
TOOLS YOU'LL Need
- Safety spectacles
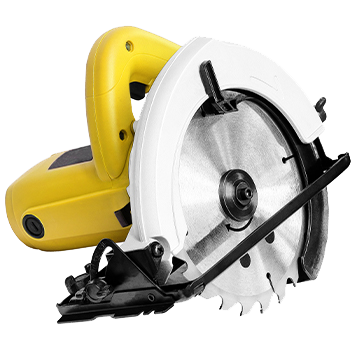
- Power miter saw / circular saw
- Cordless driver
- Exterior-grade construction screws
- Measuring record
- Carpenter square
- Cordless drill
- Recommended fasteners and installation tools
Many other tools are available that can be used for installation. All tools should be used per applicable manufacturers' instructions.
Step 1: Install Suggested Blocking
BLOCKING YOUR PICTURE FRAME
- Moving-picture show framing requires boosted blocking.
- When a deck lath runs the aforementioned direction as the joists, boosted blocking / joists must be installed to your existing substructure to adequately support and fasten the deck board.
- All infill deck boards that meet a picture frame border must be fully supported beneath the ends of each board.
- All additional framing / blocking must exist in plane across the tops of existing framing members.
- All blocking / framing must be attached / installed using exterior-grade screws. DO Non use nails.
- Boosted blocking / joists tin can be installed at xvi" on centre, maximum. However, consider installing blocking / joists at 12" on middle for a more than rigid feel.
Your Decking Masterpiece Needs a Frame
Choose whether y'all'll add a single, double, or triple moving picture frame border to your deck, then get the how-to.
Single Pic FRAME BLOCKING METHOD
Utilise 2" x 6" apartment blocking to back up the mitered corner.
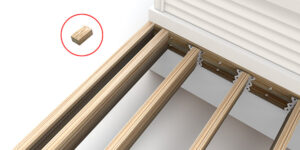
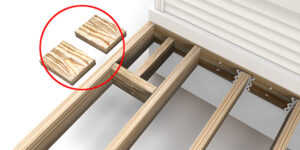
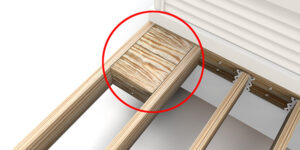
ane. Add Blocking to Corners
- Identify a solid block at all four corners of the deck to support the frame.
- You will add blocking at even intervals along the perimeter.

2. Go along Blocking Edge
- Block: 2" ten half-dozen". Length of blocking: 3.25".
- Keep applying blocking along the edge of the deck frame at an interval of 16".

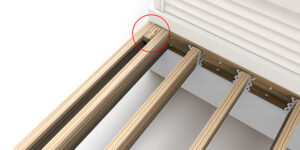
3. Add Second Support Joist
- Add a joist to support the infill deck boards.
- Identify another joist affluent forth the length of the first.
- Fasten double joist together with screws.
- Maintain all other spacing.

4. Block Substructure
- Space joists at 16" on center, max, and double joists to support infill.
DOUBLE PICTURE FRAME BLOCKING METHOD
Employ 2" x 6" flat blocking to support the mitered corner.

1. Add Blocking to Corners
- Place a solid block at all iv corners of the deck, leaving 11" clear space between the inside of the block and the corner. Corner blocking should be 9" x xi".

2. Add Corner Support Joist
- Place corner back up joist perpendicular to the blocking.
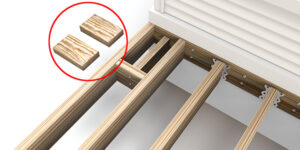
iii. Add 2 Flat Blocks
- Use ii (2) corner blocks, each 2" ten 6," cut to 9" length. Combined length of blocking: 18".

4. Keep Blocking Edge
- Keep applying blocking forth the edge of the deck frame at an interval of 16" on-center, max.

five. Add Second Back up Joist
- Add together a joist to back up the infill deck boards.
- Place another joist flush forth the length of the first.
- Spike double joist together with screws.
- Maintain all other spacing.

6. Block Substructure
- Space joists at xvi" on center, max, and double joists to support infill.
TRIPLE PICTURE FRAME BLOCKING METHOD
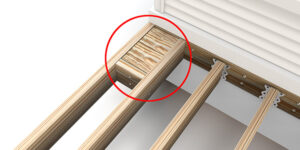
Utilise ii" x 8" apartment blocking to support the mitered corner.

1. Add Blocking to Corners
- Place a solid block at all iv corners of the deck, leaving 15" clear infinite between the within of the block and the inside of the corner. Corner blocking should be xiv.5" x xvi".

2. Add together Corner Back up Joist
- Place corner support joist perpendicular to the blocking, which is fix 1-i/two" below the top of the joists to support those flat blocks which will exist added in pace 3.
3. Add Two Flat Blocks
- Apply ii (2) corner blocks, each 2" x viii", cut to fourteen" length. Combined length of blocking: 29".

four. Continue Blocking Edge
- Go on applying blocking forth the edge of the deck frame at an interval of 16" on-centre, max.

5. Add 2nd Support Joist
- Add a joist to support the infill deck boards.
- Identify another joist flush along the length of the first.
- Fasten double joist together with screws.
- Maintain all other spacing.

6. Cake Substructure
- Space joists at 16" on center, max, and double joists to support infill.
Stride 2: Cut Your Picture Frame Deck Boards
For cutting TimberTech capped composite or capped polymer deck boards, make sure to use an appropriate saw.
Notation: Practice non use cordless saws.
CUTTING TOOLS
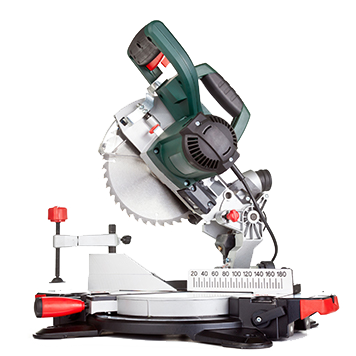
Ability Miter Saw
FOR CUTTING TIMBERTECH DECK BOARDS:
Use a miter saw with a fine-toothed, carbide-tipped finish trim bract (12" 100-tooth or ten" 80-molar minimum for PRO/Edge, 90-tooth minimum for AZEK).
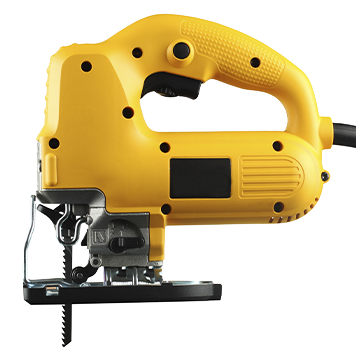
Jig Saw
FOR NOTCHING AROUND Rails POSTS:
Utilize a fine-tooth blade. (Notation: Jig saw can also be used to cut PRO/EDGE decking).
Electric Circular Saw
OTHER METHOD FOR Cutting TIMBERTECH DECK BOARDS:
Use a 60-molar fine-end blade. (NOTE: Electric circular saw tin besides be used to cutting AZEK decking).
TIPS FOR Cutting Picture FRAME DECK BOARDS
- Use the proper saw and blade.
- Cut boards one at a time.
- Ostend that you're cutting at a 45-degree angle.
- Measure out and cut your deck boards to length using a ability miter saw or sliding chemical compound power miter saw, depending on board width.
- Measure twice and cutting once.
- Review boosted info on how to cut TimberTech AZEK decking.

Step 3: Spike Your Picture Frame Deck Boards
FASTENING TOOLS

Cordless Drill
For TimberTech AZEK / PRO / Edge.
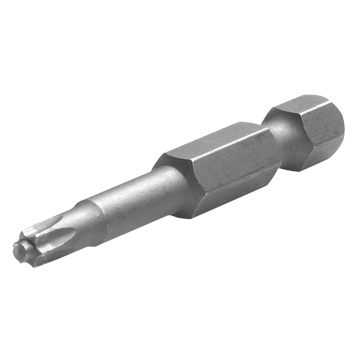
T-Tap Driver Bit
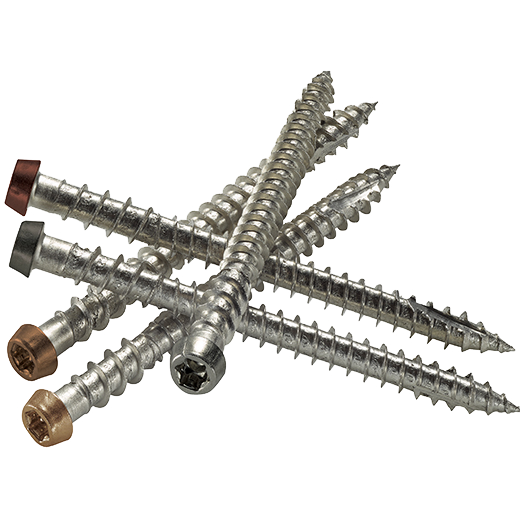
TOPLoc Color-Matched Fasteners
TOPLoc Color-Matched Fasteners
For TimberTech PRO / Border.
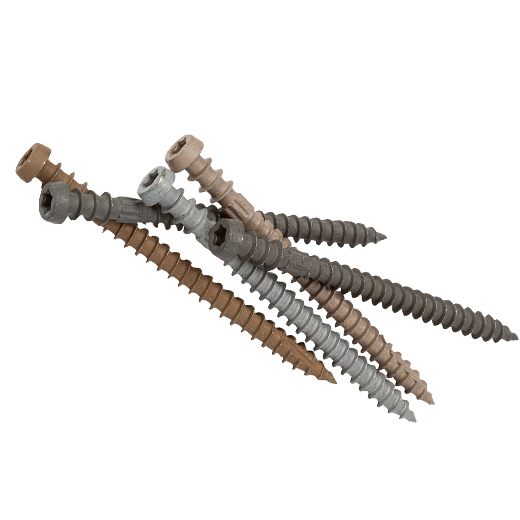
Cortex® Fasteners
Cortex® Fasteners
For TimberTech PRO / Edge.
FASTENING FOR Single PICTURE FRAME

Step 1: Lay Your Boards & Space Fasteners
- Attain a clean finished wait by allowing the pic frame edge boards to overhang the outside wood rim joist by ¾".
- Installing TimberTech AZEK fascia boards, each of which is ½" thick, volition get out a slight (¼") overhang of the movie frame border.

Step two: Cheque Your Fastener Position
- For TimberTech AZEK deck boards: Yous will need three (3) TOPLoc® for AZEK colour-matched deck screws, or Cortex®, evenly spaced on both sides of the miter (pictured). Pre-drilling not required for TimberTech AZEK deck boards.
- Miters must exist tight prior to fastening.
- Fasten along the mitered edge of each pic frame board within ½" of the border.
- For TimberTech PRO and EDGE deck boards: You volition need ii (ii) TOPLoc #8 x ii ½" deck screws, evenly spaced screws on both sides of the miter. Pre-drill the screws.
- Spike forth the mitered edge of each moving picture frame board at a minimum of ¾" from any lath edge.

Step iii: Fasten Your Frame Boards
- Border board can be flush to the wood rim if no rim joist is used, or can hang over up to ¾" if TimberTech AZEK fascia is installed.
- Installing TimberTech AZEK fascia boards, each of which is ½" thick, volition go out a slight (¼") overhang of the picture frame border.
FASTENING FOR DOUBLE PICTURE FRAME

Footstep 1: Lay Your Boards & Infinite Fasteners
- Achieve a make clean finished expect by allowing the picture frame border boards to overhang the outside wood rim joist past ¾".
- Installing TimberTech AZEK fascia boards, each of which is ½" thick, will go out a slight (¼") overhang of the motion picture frame border.

Stride two: Cheque Your Fastener Position
- Picture framing with TimberTech AZEK deck boards:
- You will need three (iii) TOPLoc® for AZEK color-matched deck screws, or Cortex®, evenly spaced on both sides of the miter (pictured). Pre-drilling not required for TimberTech AZEK deck boards.
- Miters must be tight prior to fastening.
- Spike forth the mitered border of each picture frame board within ½" of the edge.
- Picture framing with TimberTech PRO and Edge deck boards: You will need two (two) TOPLoc #8 x 2 ½" deck screws, evenly spaced screws on both sides of the miter. Pre-drill the screws.
- Fasten along the mitered border of each picture frame lath at a minimum of ¾" from whatsoever board edge.

Step three: Fasten Your Frame Boards
- Edge board tin can be flush to the wood rim if no rim joist is used, or can hang over up to ¾" if TimberTech AZEK fascia is installed.
- Installing TimberTech AZEK fascia boards, each of which is ½" thick, will exit a slight (¼") overhang of the picture frame border.
FASTENING FOR TRIPLE Film FRAME

Step 1: Lay Your Boards & Space Fasteners
- Achieve a make clean finished expect by allowing the moving-picture show frame border boards to overhang the outside wood rim joist by ¾".
- Installing TimberTech AZEK fascia boards, each of which is ½" thick, volition go out a slight (¼") overhang of the pic frame edge.

Pace 2: Check Your Fastener Position
- Moving-picture show framing with TimberTech AZEK deck boards: You volition need three (iii) TOPLoc® for AZEK colour-matched deck screws, or Cortex®, evenly spaced on both sides of the miter (pictured). Pre-drilling not required for TimberTech AZEK deck boards.
- Miters must exist tight prior to fastening.
- Spike along the mitered border of each film frame lath within ½" of the edge.
- Picture framing with TimberTech PRO and EDGE deck boards: You lot volition need two (ii) TOPLoc #viii ten 2 ½" deck screws, evenly spaced screws on both sides of the miter. Pre-drill the screws.
- Fasten forth the mitered border of each pic frame board at a minimum of ¾" from any board edge.

Footstep 3: Fasten Your Frame Boards
- Border lath tin can be flush to the woods rim if no rim joist is used, or tin hang over upward to ¾" if TimberTech AZEK fascia is installed.
- Installing TimberTech AZEK fascia boards, each of which is ½" thick, volition leave a slight (¼") overhang of the moving-picture show frame border.
NOTE
TimberTech does non recommend any fastener that is non explicitly stated in the TimberTech Decking Installation Guide. Use of any alternative fastener does not void the TimberTech warranty; however, if a decking failure is caused past using one of these alternative fastening methods, any corresponding claims will be denied.
Pace 4: Fasten Your Infill Deck Boards

To Install
The Remaining Deck Boards
- Complete fastening the motion picture frame boards along the perimeter of the deck.
- Measure the length betwixt the motion-picture show frame boards:
- If using AZEK decking, keep ends tight to the movie frame border.
- Each stop of infill boards: Use two (2) screws within ½" ends.
- If using TimberTech PRO or Border, provide gap at the ends of infill boards, per Barrel JOINT GAPPING REQUIREMENTS chart.
- Each end of infill boards: Pre-drill and spike two (2) screws within ¾" from edges.
- If using AZEK decking, keep ends tight to the movie frame border.
- Install the infill deck boards per the installation instructions.
Go THE Right INFO FOR YOUR CHOSEN DECKING LINE
Explore the Deck Building Resource Middle to get installation tips for the specific TimberTech decking line you choose for your project.
Note
The techniques shown should be used for best results. Results may vary, as expansion and wrinkle could all the same occur. AZEK Building Products Inc. claims no liability or responsibility for the improper installation of this product. Since all installations are unique, information technology is the sole responsibility of the installer to make up one's mind specific requirements in regard to each decking awarding. AZEK Building Products recommends that all designs be reviewed by a licensed builder, engineer or local building official before installation. Please contact AZEK Customer Service prior to installing if you have question or concerns.
Footstep 5: Prolong the Aesthetics of Your Deck
While TimberTech capped composite and capped polymer decking is specifically engineered for enduring beauty, it's always wise to keep your backyard build free of dirt, debris, and spills. To maximize the aesthetics of your deck, we recommend using TimberTech® DeckCleaner™.

USE THE Appropriate BRUSH
When cleaning your TimberTech AZEK decking with DeckCleaner, employ a stiff, natural-fiber brush. When cleaning TimberTech PRO or Edge decking with DeckCleaner, use a medium-to-stiff nylon brush.
For total details on keeping your capped composite deck looking as great on day i,000 as solar day 1, read more over on Care & Cleaning.
Source: https://www.timbertech.com/resources/deck-building/how-to-picture-frame-a-deck/
0 Response to "what is the best way to frame fiberon symmetry railing"
إرسال تعليق